Uncategorized

Inspiring Interior Design Ideas to Transform Your Space

interior design

The way a home or office is designed has a major impact on comfort, functionality, and overall mood. Interior design is not just about choosing attractive furniture or paint colors—it is about creating a balanced environment that reflects personal style while maximizing space and usability. Whether you want to refresh a single room or redesign an entire property, exploring creative interior design ideas can help bring your vision to life.

Embracing Minimalism

Minimalist design has become a popular choice for its simplicity and elegance. This style focuses on clean lines, neutral tones, and clutter-free spaces. By using only essential furniture and decor, minimalism creates a calming atmosphere that feels spacious and organized.

To achieve this look, choose furniture with sleek designs and prioritize functional pieces. Neutral shades like whites, grays, and beiges form a great base, while a few accent colors can be added through textiles or artwork. The key is to keep the design simple yet sophisticated.

Adding Warmth with Natural Elements

Bringing nature indoors is one of the most effective ways to create a welcoming space. Incorporating natural materials such as wood, stone, or rattan can add texture and warmth to a room. Indoor plants are also excellent for enhancing design, as they not only add color but also promote a healthy environment.

Consider using wooden furniture, stone countertops, or woven rugs to infuse natural beauty into your interior. Large windows that allow sunlight to flood in will also help create an inviting and refreshing atmosphere.
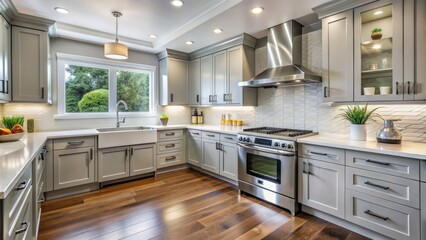
Open Concept Living

Open floor plans have become a staple in modern interior design. Removing unnecessary walls between the living room, kitchen, and dining area creates a seamless flow and makes spaces feel larger. This design encourages social interaction and allows natural light to travel throughout the home.

To maintain structure in an open layout, area rugs, lighting, and furniture arrangements can help define different sections without interrupting the openness. This approach is ideal for creating a versatile space that adapts to various activities.

Creative Use of Colors

Color is one of the most powerful elements in interior design. Different shades can completely change the feel of a room, from making it cozy and intimate to bright and energizing. Neutral palettes remain timeless, but adding bold accents can create striking visual interest.

For example, deep blues or greens can introduce a sense of sophistication, while warm yellows and oranges add energy and vibrancy. Accent walls, decorative pillows, or patterned rugs are great ways to experiment with colors without overwhelming the space.

Functional and Stylish Storage

Clutter can easily ruin even the most beautifully designed space. That is why integrating smart storage solutions is essential in interior design. Shelves, built-in cabinets, and multi-functional furniture such as storage ottomans or beds with drawers can help keep spaces tidy without sacrificing style.

By blending storage with design, you can create a functional home that looks organized and stylish at the same time. Open shelving, for instance, allows you to display decorative items while keeping essential items easily accessible.

Lighting as a Design Element

Lighting is often underestimated, but it plays a crucial role in shaping the atmosphere of a room. Layered lighting, which combines ambient, task, and accent lighting, provides flexibility and depth to any space.

Chandeliers, pendant lights, and floor lamps can serve as decorative focal points while also illuminating the room effectively. Natural light should also be maximized through large windows, mirrors, or light-colored curtains that allow brightness to filter in. Proper lighting not only enhances aesthetics but also boosts functionality.

Mixing Textures and Materials

A space feels more dynamic and inviting when different textures and materials are combined. Soft fabrics like velvet or linen can contrast beautifully with harder surfaces like glass, metal, or wood.

Adding layers through textiles such as cushions, rugs, and curtains can create warmth and coziness. At the same time, sleek materials like marble or polished metal provide sophistication. The balance of these elements creates a visually appealing design that feels complete.

Personal Touches for Character

Interior design is about more than trends—it is about making a space reflect your personality. Incorporating personal touches such as artwork, handmade decor, or cherished items makes a home truly unique. These details tell a story and bring life to a room.

Rather than following every new design trend, choose elements that resonate with your taste and lifestyle. This ensures the space feels authentic and comfortable while maintaining style.

Sustainable Interior Design

Sustainability has become a growing focus in modern interior design. Choosing eco-friendly materials, energy-efficient lighting, and durable furniture not only benefits the environment but also creates healthier living spaces.

Natural fabrics, recycled wood, and low-VOC paints are popular choices for sustainable interiors. Incorporating durable designs ensures long-term value while reducing the need for frequent replacements. Sustainability in design combines beauty with responsibility, making it a meaningful choice for any home.

Small Space Design Solutions

Designing small spaces requires creativity and strategy. Multi-functional furniture, vertical storage, and mirrors can make compact areas feel larger. Lighter colors on walls and ceilings also enhance the sense of openness.

Folding tables, wall-mounted shelves, and hidden storage help maximize every inch of space. By focusing on efficiency without sacrificing style, small interiors can be just as stunning as larger homes.

The Balance of Comfort and Style

At the heart of interior design is the balance between comfort and style. A beautifully designed space should not only look good but also feel practical and livable. Comfortable furniture, well-planned layouts, and thoughtful details ensure that a room supports daily life while maintaining elegance.

When comfort and aesthetics work together, the result is a space that feels inviting and timeless.

Interior design is a powerful way to transform any space into a reflection of personality, functionality, and beauty. From embracing minimalism and natural elements to experimenting with colors and lighting, there are endless design ideas that can suit every style and need.

By combining creativity with practicality, interior design allows you to create spaces that are not only visually stunning but also comfortable and efficient. Whether it’s a small apartment, a family home, or a modern office, thoughtful design choices can make any environment inspiring and enjoyable.

Cabinet Refinishing

How Long Does Cabinet Painting Take?

Cabinet Painting Sacramento

Cabinet painting is a major project that takes several days to complete. The exact duration depends on your kitchen’s size, the initial condition of your cabinets and how much preparation is required.

Begin by cleaning your cabinets with a degreaser and sanding any rough spots to prepare for priming. Then, label and organize hardware to simplify reassembly. Contact Cabinet Painting Sacramento for more details.

Preparation

Before you start painting, it is important to thoroughly clean your cabinets. This step ensures that any grease or grime is removed from the surfaces, and helps the paint adhere properly. Use a degreaser spray or warm water and a soft cloth to wipe down the surfaces, and focus on high-touch areas like drawer pulls and edges. If necessary, patch any cracks or imperfections with wood filler and sand the surfaces to smooth them. If you have any hardware holes to re-hole, be sure to do so before moving on to the next step.

It’s also a good idea to protect any surfaces you don’t want to get paint on, such as countertops or appliances, by covering them with drop cloths. You should also make sure to clear out and label any cabinet doors or drawer fronts before you start working, and take photos if possible. This will save you a lot of time and frustration when it comes to reassembly later on.

The condition of your cabinets will also have a big impact on how long the job takes. New cabinets are usually in pristine condition, and will require less preparation work than older cabinets that have been painted or stained before. You should also factor in how many cabinets you have, as this will increase the amount of surface area that needs to be painted.

Once the surfaces are cleaned, sanded, and prepped, it is time to begin the painting process. The best way to paint cabinets is to use a sprayer for the bigger flat surfaces, and an angled sash brush for corners and details. Be sure to apply several coats, and allow each coat to dry fully before applying the next one.

Depending on the size of your kitchen, the number of cabinets, and your skill level, the total project can take from a weekend to a week to complete. A professional cabinet painter will have a much faster turn around time, and can provide you with a better quality finish that will last longer than a DIY job. Be sure to compare quotes from a few different companies, and ask about their preparation process, product brand, and workmanship warranty to ensure you’re getting the best value for your money.

Priming

This is the most time-consuming phase of cabinet painting. It includes cleaning and sanding surfaces, filling cracks, and repairing dents and chips. It’s important to take your time to ensure the final paint job will last. If you skip these steps, the new paint could start chipping or peeling soon after it’s applied.

This step starts with a thorough clean to remove grease, dirt, and grime from the surface. It’s also a good opportunity to repair any minor damage like holes, dings, or dents. You can use a degreaser or warm water with a splash of dish soap to loosen stuck-on debris and wipe the cabinets down. Once the surfaces are clean, lightly sand the cabinet frames using 120 to 150 grit sandpaper. Be sure to wipe away any sanding dust between steps or it will mess up the finish later.

Then, apply a quality primer. Choose a primer designed for cabinetry that will help the paint stick and block stains or wood grain from showing through. A high-quality primer like Fresh Start High-Hiding All-Purpose Primer is a favorite of professional painters.

Once the primer is dry, you can start painting. Again, this can vary depending on the type of paint you select, but expect to need at least two coats. It’s best to use a high-quality brush for corners and detailed areas, while rollers work well on flat surfaces. A spray gun can speed up the process but requires more expertise to use safely.

Once the paint is applied and dried, you can reattach the doors and hardware. Then, you can enjoy your newly refreshed cabinets! Studies show that refreshed cabinets make homes sell faster, so you can expect to recoup your investment when it’s time to move on.

Painting

Cabinet painting isn’t as simple as opening a can of paint and swiping it on. There are many steps involved in this process, including priming, sanding, and multiple coats to achieve a professional-looking result. Taking the time to properly prep your cabinets for painting will ensure that your new finish lasts longer and looks better.

During the painting phase, it’s important to keep in mind that the number of coats needed will depend on the color and type of paint used. It’s also important to allow the paint to dry between coats, which may take 2-4 hours. It’s also recommended to use a sprayer during this phase, as it will help speed up the process and produce a smooth, even finish.

When spraying, it’s also important to mask off countertops and appliances to protect them from overspray. A good quality painters tape will provide an extra layer of protection and prevent any paint from transferring to areas it shouldn’t be. Additionally, it’s a good idea to remove the hardware from the cabinets and use wood filler or spackle to patch any imperfections or holes in the cabinet frame or doors. This step typically takes 1-2 hours.

After the primer is fully dry, it’s time for the cabinet paint to be applied. This can be done either by brush or with a sprayer, although it’s recommended to spray for the best results. Spraying requires more practice and technique than brushing, but once you get the hang of it, it can be much faster and give you a more professional-looking finish.

Depending on the type of paint used, it may require several coats to achieve full coverage and a smooth, even finish. It’s essential to let each coat fully dry between applications, which will take 2-4 hours per coat.

Once the final coat is applied, it’s time to reattach the cabinet doors and hardware. Be sure to label the hardware before removing it to save yourself time during the reassembly process. It’s also recommended to wait until the paint is fully cured before using the cabinets, as this will help prevent smudges and other damage.

Drying

The final phase of cabinet painting involves applying a coat or two of paint and allowing it to dry. This can take up to 48 hours, and it’s important to be patient and to exercise caution. During this time, you should avoid touching or handling the cabinets to prevent smudges and other damage.

It’s also important to note that the drying process is influenced by environmental conditions such as humidity and temperature, so it’s essential to plan accordingly. For instance, painting during a cold winter can significantly slow down the drying process. In addition, hot or humid weather can impact the adhesion of the paint and may result in flaking or other issues.

Generally speaking, it takes about three to 10 days to complete a kitchen cabinet painting project depending on the size of your kitchen and the desired finish. However, proper preparation work can reduce the overall painting time by up to 40%.

Proper prep work includes thorough cleaning, deglossing and sanding, chemical stripping in certain cases, wood filler, high-quality primer, and finally painting. The actual painting method — whether spraying or brushing — can also have a significant impact on the overall project duration.

If you’re aiming for a premium finish, you will likely need to apply multiple coats of paint and allow each to fully cure. This will add an additional 2-4 hours per coat of application and 24 hours of drying time, adding to the total painting time.

In addition, the quality of your paint and the skill level of your team can also have a significant impact on how long it takes to complete the project. A professional, experienced team can often get the job done in a fraction of the time it takes a beginner to achieve comparable results. It’s important to consider these factors when planning your renovation project, as they can significantly affect the end result and the cost of your project. By following the best practices, you can ensure a beautiful, professional-looking finished product within a realistic timeframe.